Wednesday, December 10, 2014

Super Easy Crochet Infinity Scarf

I have to admit that I have a long-term love affair with infinity scarves. It all started a little over a year ago when my sister brought me a beautiful gift from the US when she came to Madrid for my wedding. I pulled out a gorgeous slate grey and turquoise piece of material, smiled, and said "Please tell me this isn't a dress."

It was my first infinity scarf, and I was hooked (pardon the pun). In fact, I'm wearing that very scarf as I write this post!

Crochet infinity scarves are all over the place. Just look at these beautiful examples found on Pinterest:


Although I've made more than a few crochet infinity scarves, I wanted to develop a super easy infinity scarf that isn't worked in the round. This scarf is easy for beginners and experienced crocheters, and it doesn't require you to work in the round to get that a beautiful looped scarf!

Here are a few photo ops of the easiest infinity scarf ever!

Wound three times around the neck!

Wound twice!

Up close and personal

Ok, here's the pattern! It's super easy. You can use any yarn and hook size you like and repeat as many beginning chains as you like to achieve the length you want. Just be sure to add an extra 2ch at the end of the beginning chain to account for the turn (so you will always start your first dc on the 3rd chain from the hook!).

Yarn: Katia Alaska (bulky)
Hook: 7.00mm
Number of skeins: 2 (200g total)

Ch 182.
Round 1: Dc in 3rd chain from hook and across (180dc). Ch 2 and turn.
Round 2: Hdc in each st across (180hdc). Ch 2 and turn.
Repeat rounds 1 and 2 until the scarf is the desired width.
When final round is complete, ch 1, turn and loosely slip stitch across the entire row. Then line up the two ends of the scarf and stitch them together with slip stitches (this will be an inside seam that you won't see later!). Slip stitch around the length of the other row.
Tie off and weave in ends.

There you go! You've made a long scarf with a very easy, yet beautiful, pattern. The slip stitch around the edges gives it a nice finish, and stitching the ends together with slip stitches gives you an infinity scarf with a seam that will be on the inside of the scarf, so you will never see it!

Super simple and super gorgeous! Enjoy, and happy holidays from MadridMetroMod!


Sunday, November 16, 2014

Super easy unisex scarf!

One of my favorite crochet gifts to give and receive is a scarf! They are so easy to make, they have that zen-calming effect, and they add pizazz to any wardrobe (not to mention the wonderful warmth you get from a scarf in Madrid's chilly season!).

To me, a really great scarf pattern has to have three characteristics:

  • easily resizable pattern
  • very few, uncomplicated stitches but with some texture
  • can be finished in less than one month of once-a-week leisure crocheting or one week of intense crocheting
A few weeks ago, my husband and I visited Lanas Sixto since he reminded me that the last scarf that I made for him was over 2.5 years ago. (Check out my post on Lanas Sixto in Madrid here!) He picked out a dark grey Alaska Katia yarn (colorway 10) and I started looking for patterns that night! I used a 7.00mm hook with this yarn and was really satisfied with the results (I would have tightened the chain just a touch in retrospect). After practically two years of being solely dedicated to our wedding and my doctoral thesis, I was so excited to get some yarn in my hands again!

I found this great pattern on Ravelry called the Easy-Wear Scarf by Lion Brands Yarn. I loved the fact that it was simple but had a nice unisex texture. I started hooking in my downtime - 1 or 2 hours per week - and two weeks later, I have a beautiful finished scarf that I'll gift to Jorge this afternoon at our family lunch!

Of course, I made some adjustments to the pattern:
  • I repeated the chain stitch until Jorge liked where it fell when looped around his neck one time (more like 180 ch stitches plus the 1ch for the turn).
  • I completed about 18 rows rather than 14 to make the scarf a bit thicker.
  • I slip stitched loosely all the way around the scarf (2 sl st in each corner!) when finished, and I love the look that it gave the final product.
You can check out all the details in my Ravelry notebook, and here are some images of the finished scarf:


Monday, January 20, 2014

Wedding Pictures of My Crochet Bridal Bouquet!

Hello, everyone! Yesterday, my husband and I celebrated three months of wedded bliss! These months have been a bit crazy - honeymoon in Paris!, lots and lots of immigration paperwork, and more hours of our "real jobs" - so our blogging time has been minimal. Rest assured that we are healthy and happy in Madrid, and that MadridMetroMod will be re-opening on Etsy soon! And perhaps with a new surprise!

Today I wanted to share with you some of my favorite shots of my crochet bridal bouquet. You might remember from this post that I spent about 100 hours crocheting and arranging my bridal bouquet, and after seeing these pictures, I can definitely say that it was worth every minute.

So many people stopped me on my wedding day to admire my bouquet. It appears in almost every guest's photos, and even the wedding coordinators said that they had never seen such a beautiful and unique bouquet!

Please enjoy these photos! Also, if you (or someone you know) is looking for a crochet bridal bouquet, please contact me at madridmetromod @ gmail . com for ideas and a free price quote!


I would also like to thank Alberto Desna Photography for these amazing photos!

Tuesday, August 13, 2013

How to Make a Crochet Flower Bouquet

Wow, it has been a long time since my last post! I have been so busy this summer writing my dissertation and planning my wedding!! that my Etsy shop and blog have been running on autopilot.

Yes, that's right: I said planning my wedding!

My boyfriend and I got engaged on May 4, and we have been busily planning the wedding since we wanted to get married in the fall so that my parents could attend here in Madrid.

My one crochet project for the wedding (although more than a few have tempted me) was a crochet bridal bouquet. So here it is:


A view from above!


Please check out our photographer's photos of my bouquet on the Big Day here!

I was inspired by these beautiful bouquets to make my own:


After spending a lot of time researching floral patterns and bouquet techniques, I started crocheting.

And I crocheted. And crocheted. And crocheted. And then, just when I thought my fingers would fall off, I crocheted some more. All in all, I made about 30 crocheted flowers, 27 of which I used in the final bouquet. Some were discarded because of color - I started with yellow and white before deciding that I wanted different red and white tones.

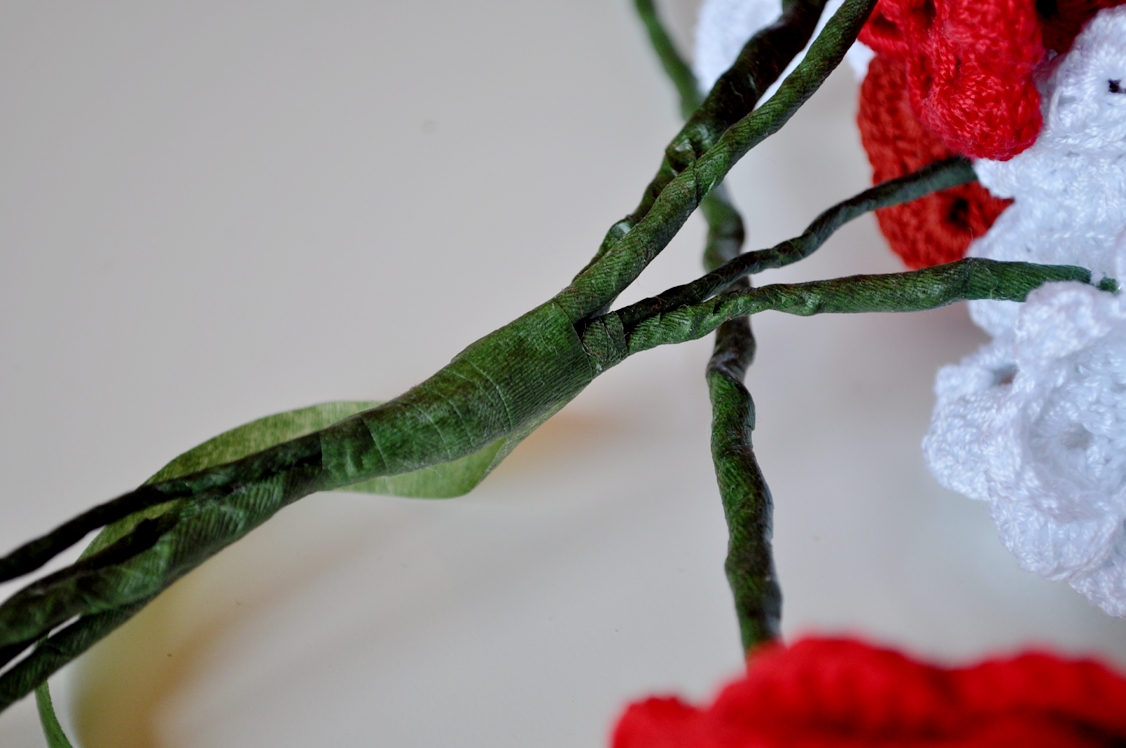
After I finished crocheting each flower, I added a stem using 0.3mm or 0.6mm wires (three in each flower). I inserted the wire into the button, if possible, or directly through multiple layers of the flower if necessary. Then I twisted the wires together (carpal tunnel, anyone?). Each wire stem then had to be covered with green floral tape.

Just a hint: Do all of your taping last, because your hands get quite sticky and you won't want to touch your yarn after taping. I figured this out half-way through my flowers and then spent an afternoon taping the remaining half.

I used patterns from Ravelry - some free and some not - to make my flowers. Some are more traditional roses made with 100% cotton yarn and some are intricate little flowers made with size 8 crochet thread, a 1.6mm hook (ouch!) and 0.3mm metal wire crocheted directly into the petals.

Just when my work station started to look like a floral nightmare, I started wondering: How exactly do I turn these flowers into a bouquet?

Do I use a filler flower? Do I incorporate leaves? How do I get the flowers to stay together without moving around? These are some of the questions that I researched, thought about and discussed with my great crochet buddy Madalena!

After a lot of thinking (and dozens of trial bouquet arrangements without taping) I decided it was time to start making a flower bouquet from all of my crochet flowers!

First, I prepared a large work table with green floral tape and a comfortable chair.

I laid out all of my flowers according to size and color so that I could see what remained as I was arranging.


My bouquet was based on one center rose, four roses surrounding the center rose, four between those surrounding roses, and four between those surrounding roses. This helped me create a rounded bouquet shape, and I chose the smallest rose as the center. Then I added in smaller filler flowers throughout the bouquet.

So I picked up the center rose and one of the surrounding roses and taped them together. You want to leave 2-3" before you start taping so that you have some wiggle room to readjust the flowers once they are all taped together. This goes for all the flowers.

You want to start taping about where my fingers are.
Then I added in another surrounding rose and a filler flower:


This is what the bouquet looked like from the bottom:

Don't mind that random red rose that's perpendicular to the bouquet. He just got in the way!
I continued taping each layer of four roses. You want to run the tape up and down the stems in a length of about 2-3", always remembering to leave some space between the top of the tape and the bud of the flower.

I added in filler flowers on each layer. My hands got very sticky from the tape, and it became hard to see the vision once I had a lot of flowers (which is why it helped to see clearly what I had left on the table in front of me).

Once I finished adding flowers, I taped around everything about 20 times and then broke off the floral tape.

Here's the finished product (for now!)


The next step is to trim up the "stems" and add a satin ribbon so that my hands don't get sticky on the big day!

Have you made a crochet flower bouquet? What tips and tricks helped you?

Saturday, February 23, 2013

Criss Cross makes me want to jump

After three (very long) weeks of having these two projects sitting in my basket, waiting on the perfect buttons and a surge of motivation, I have finally finished two pairs of...

Criss Cross Baby Ankle Boots!

These boots are inspired by Mon Petit Violon's Polka Dot Mary Baby Mary Janes, for which the pattern is available in her Etsy shop. Like all of her patterns, I love these high top Mary Janes, and I made a pair last year while on vacation:


However, I wanted to combine the idea of the criss cross in these Mary Janes with an ankle boot. I didn't want it to be too tall, so I made a short ankle and I closed the boot on the bridge of the foot.

I made a pair in grey (with a charcoal button) and a pair in pistachio green (with an amazingly mustardy yellow wooden button!):


My bestest crochet friend M. threw around button ideas with me, and I found these amazing charcoal buttons at her suggestion! Then I looked around in my stash and decided on the mustard yellows for the green pair after holding a button debate session at last night's Madrid Knits! yarn circle.

They are both live on my Etsy shop. The green pair is here and the grey pair is here. I am in love with this design!

I modified the design slightly between each pair, placing the criss cross higher up on the grey pair than on the green pair. I'm still not sure which I like better. What do you think?

Monday, February 4, 2013

Madrid Knits! yarn circle in Madrid

Last week, a member of a Facebook group that I am in asked whether or not there are any knitting or crocheting circles in Madrid. Another member pointed us all towards Madrid Knits!, a yarn circle that meets every week near the Santiago Bernabeu football stadium.

I was so excited about finding a group of yarnies that I wasted no time in packing up my yarn and making my way to the class on Friday evening! I had a great time getting to know all of the men and women of Madrid Knits! and I even finished a bunny crochet hat based on this pattern.

I love this pattern from Sunset Crochet on Etsy!
I still have to sew the ears on the bunny hat from Friday, but here is another one that I made last month:


You can join Madrid Knits! every Friday night (and the first Saturday of each month) if you are in the Madrid area! Here are the details:

Who: Madrid Knits! yarn circle
When: every Friday night from 17:00-21:00
Where: Starbucks, calle Pedro Teixeira, 8 (barrio Tetuán)
How: Just show up, add your name in the notebook and say hello! There are lots of English-speaking members, and it is a great chance to practice your Spanish! (There are also members that speak Dutch and Portuguese!)
Why: You need some motivation to finish that latest project, you want the inside on great yarn shops in Madrid, or you are just looking to meet some guys and gals who share your hobby for yarn crafting!

You can check out a weekly report of Madrid Knits on their blog: Madrid Knits!

Wednesday, January 30, 2013

Sale!

This week, my Etsy boutique Madrid Metro Mod reached its 30th sale! To celebrate, I am offering a 30% discount on every item in the shop! Now is the perfect time to purchase the hat or baby booties that have caught your eye!

Etsy coupon code: FIRST30SALES
Expires: February 04, 2013

Thank you to everyone who has supported my shop during these first six months! I am more dedicated than ever to bringing you high quality baby items that become family heirlooms for generations!

Hugs and stitches,


Tuesday, January 29, 2013

Blue, like the moon and Christmas without you

I made three hats this weekend after a great trip to Lanas Sixto (you can read about this yarn shop here) and when I stepped back, I realized that they were all some version of the color blue!

So, even though I had a wonderful weekend and a great trip to Segovia on Monday and am feeling as happy as a circus flea, I suppose that I have to say it... "I'm feeling blue!"

One of my favorite hats is this new double pom newborn beanie, made for a custom order for my Etsy boutique!


You can find the pattern for this double pom beanie on my blog here or on Ravelry here.

I had some leftover yarn, although not enough to make a duplicate hat (which I would have loved!) so I made a striped beanie with a giant pom pom. I love how the colors progress from dark to light!


Finally, I improvised a newborn conductors cap based on an adult pattern that I used to make my very own conductors cap. More on that later, but for now, a little teaser picture!


By the way, this indigo conductors cap is still for sale in my Etsy boutique!

Sunday, December 9, 2012

New Christmas Ornament Pattern for Sale!

I am definitely in the Christmas spirit and cannot wait to go home to Virginia in two weeks and celebrate the holidays with my family! It seems to me that Madrid is just bursting with Christmas decorations this year, and I was super inspired to make some cute ornaments! Here they are:


I am in love with this little stocking, wreath and snowflake, and I can't believe how easy they were to make! I finished each one in under 30 minutes!!!

I was sure to write the pattern so that every level of crocheter can enjoy. If you can work in rows, work in the round, and do basic stitches (including front post and back post double crochet, but don't worry - I explain how to do it!), you can make these cute and quick ornaments!

You can purchase this pattern in my Etsy shop here.

You can also purchase this pattern as a Ravelry download! Instant gratification! :)


Happy holidays and happy crocheting, everyone! :)

Monday, December 3, 2012

Small Chunky Crochet Nesting Basket Pattern

Hi guys! As a Christmas gift, I am working on some nesting baskets based on the pattern provided by Liz at Crochet in Color. You can find her awesome patterns for the large and medium basket on her blog here.

I wanted to make a third, smaller basket, to nest inside these two. It turned out so cute, and I hope it helps if you want to make a nesting set! Please post comments if you make this basket, including a photo so we can see your amazing handiwork!

All three baskets in a cute little nest!
Please note that you will still be working with two strands of extra chunky yarn. I used two strands of Katia Alaska and a 7.00mm hook.


The small blue basket measures approximately 6" / 15.5cm in diameter and is about 4" / 11cm deep.

Small Nesting Basket:

R1: Ch 2 and 8 sc in 2nd ch from hook. Join with sl st to ch 2. (8)

R2: Ch 2. Hdc in same st. 2 hdc in next 7 sts. Join with sl st to ch 2. (16)

R3: Ch 2. Hdc in same st. Hdc in next st. [2 hdc in next st, hdc in next st] around. Join with sl st to ch 2. (24)

R4: Ch 2. Hdc in same st. Hdc in next 2 sts. [2 hdc in next st, hdc in next 2 sts] around. Join with sl st to ch 2. (32)

R5: Ch 2. Hdc in same st. Hdc in next 3 sts. [2 hdc in next st, hdc in next 3 sts] around. Join with sl st to ch 2. (40).

(R6 begins the body of the basket)

R6: Ch 1. Sc around basket working in loop behind the back of the stitch. (Note: This is not working in back loops only, but rather the loop created behind the back loop of the stitch in the previous row. Crocht in Color has a wonderful tutorial on how to do this step here.) Join with sl st to Ch 1. (40)

R7: Ch 2. Hdc in next st and around basket. Join with sl st to Ch 2. (40)

R8: Ch 1. Working in back loops only, sc in same st and around basket. Join with sl st to Ch 1. (40)

R9: Ch 2. Hdc in next st and around basket. Join with sl st to Ch 2. (40)

R10: Ch 1. Sc in same st and around basket. Join with sl st to Ch 1. (40)

R11: Ch 1. Working in back loops only, sc in next st and around basket. Join with sl st to Ch 1. (40)

R12: Ch 2. Hdc in same st and in next 6 sts. Ch 5. Sk next 4 sts. Hdc in next 18 sts. Ch 5. Sk next 4 sts. Hdc in next 7 sts. Join with sl st to Ch 2.

R13: Ch 1. Sc in next 6 sts. Work 6 sc in the handle (the Ch 5 space from previous row) Hdc in next 18 sts. Work 6 sc in the second handle (the Ch 5 space from previous row). Hdc in next 7 sts. Join with sl st to Ch 1.

Note: I added a round of slip stitch to all three nesting baskets because I like the finished look that it gives to the top of the basket. This is optional.

R14: Ch 1. Sl st in next st and around basket. Sl st to Ch 1. Fasten off and weave in ends.

I hope that you enjoy this basket, and I want to send out a huge thank you Liz from Crochet in Color for her inspiration for this pattern!

Hugs and stitches! :)


Friday, November 16, 2012

Madrid Metro Mod's Catalog

I still love Etsy, although I find that clients get frustrated when they can't see my entire inventory in one spot. Maybe I've sold an item and it's difficult to find under "sold items," and then I get an email or a Facebook message saying "Remember that cute hat that you made with the braids? I'd like one of those." Then I get frustrated, because I've made 10 hats with braids, and I'm sure that at least 6 of them were cute!

To help out, and to create a portfolio where all of the items that can be custom ordered are shown, I have created a blog called the "Madrid Metro Mod Catalog." Please check it out here!

Thanks a bunch!

Hugs and stitches,

Lanas Sixto at last!

Last Saturday, I made my first trip to Lanas Sixto! Lanas Sixto, along with Pontejos and El Gato Negro, is probably among the most famous yarn shops in Madrid. Unlike Pontejos, it deals exclusively in yarns. Unlike El Gato Negro, it does not sell yarn by weight... even though the antique facade of the building still professes "Ventas al peso" (sold by weight). I'm not making it up:

Photo Credit: commons.wikimedia.org

Lanas Sixto is not located in the yarn-opolis near the other famous yarn and haberdasheries, but it is super close! Check out this map:


It was a really nice fall day to take a walk, so we scooted up to Lanas Sixto looking for LOTS of yarn. I am making some crochet baskets using this pattern by Crochet in Color for Christmas gifts, and I wanted to pick up a few skeins of yarn to begin the work.

I had this brilliant idea to do a nesting set of these baskets in fading colors, from light to dark. Seeing as how I was making three baskets (plus a trial basket for hats and gloves in our apartment), and each basket requires 2 skeins of chunky yarn, I knew that I was going to pay a pretty penny for my supplies!

I went to Pontejos, but the least expensive chunky yarn that I could find (that wasn't horribly ugly!) was 5.25€ per skein of 50g. Ummm, so that would make my little "project" total somewhere around 60€! Before I committed, I decided to head to Lanas Sixto, and I am so glad I did!

First of all, the buying experience at Lanas Sixto (on a Saturday morning, mind you, when EVERYONE is buying yarns) was really nice. There were no pushy shop people demanding that you pick out your yarn immediately, and they had lots of yarns out where you could touch them. Here's a photo of the shop so you can get an idea:

Photo Credit: www.libertaddigital.com
Lanas Sixto deals mostly in Katia yarns, and their prices seemed very reasonable. I settled on eight skeins of Katia Alaska:


For now, I won't reveal the color scheme, just in case the receivers of my Christmas baskets happen to read this blog, but I am super excited! I also picked up a 7mm hook to make said baskets.

I finished one basket in about 2 hours for our apartment. I chose mustard yellow to go with our walls, although I'm not crazy about how the photo turned out... apartment lighting is tough! But just to give an idea:


So how much did I pay for said 8 skeins of yarn and hook? Sixty buckaroos? No way!! I paid 24€ for the yarn and hook, and there were lots of yarns in all price ranges at Lanas Sixto.

If you are content with a fine Spanish brand of yarn and are scared to face the crowds of Pontejos or El Gato Negro, I'd definitely recommend walking up the street and see what deals you will find at Lanas Sixto.

And if you're scared about your (developing) Spanish yarn vernacular, check out my awesome English-Spanish Crochet Dictionary!

Monday, October 22, 2012

Charity scarves

We visited Olombrada this weekend and attended mass on Sunday morning. The parish was celebrating "Día de la misión," or a day celebrating religious missions of all types. They might be personal, within the town, or around the world. The priest emphasized the presence of missionaries all around the world and he, being from South America, gave thanks for the missionaries who brought Catholicism to the Americas.

The priest encouraged everyone to give what he or she was able to give to help support missions around the world. Since I'm not in a position to give financially, I thought that I would work on some scarves that the priest could send to missionaries around the world or give to some of the elders in the parish that don't have anyone to take care of them. Even though this will take some time away from my Etsy shop, I believe that it's important to give back, and I am looking forward to this project.

I will be using yarn that I have stashed and patterns that are (hopefully) easy and quick so that I can make as many scarves as possible by our next trip to the village in November.

I will also post the patterns that I am using on this blog post.

1. Ribbed Scarf, by C. L. Halvorson, on Ravelry.com

If you have a quick or easy pattern that you would like to send my way, please leave me a comment!

Wednesday, October 3, 2012

Baby Gabriela!

I absolutely love seeing my little creations on the babies they were made for, and so I present to you...


Baby Gabriela with her adorable ankle boots and sleeping owl hat! You can find more of these items in the following sections of my Etsy shop:

Baby footwear

Animal Hats

Double Pom Newborn Beanie - Pattern!

Hi, everyone! My September was taken up with custom orders and getting myself used to my new job, so I didn't have much blogging time.

Last Friday, I noticed that I still had 50g of a beautiful Italian yarn that I bought at Lanas Pinguino last year. Lanas Pingouin is located in Chamberí, at calle María de Guzmán, 55. I used to live around the corner from that yarn shop, and I didn't purchase much there, but I love the quality of the yarns that I did purchase. In fact, I'm thinking of heading back soon, because the owner had great prices on thicker yarns. I wanted to use up the blue-grey yarn, so I made this cute little beanie, and I thought I'd share the pattern with you.


Even though I've written lots of them, this is my first attempt at sharing a pattern. If anything is unclear, please let me know.

Materials:
  • 50g bulky yarn
  • 6.00mm crochet hook
  • scissors
I did not measure my gauge, but the finished measurements can be found on my Etsy listing.

R1: Make a magic ring. Ch 2 and 8 hdc in ring. Close ring and join with a sl st to top of 1st hdc. (8)

R2: Ch 2. 2 hdc in each st around. Join with sl st to top of 1st hdc. (16)

R3: Ch 2. 2 hdc in joining st. 1 hdc in next st. (2 hdc in next st, 1 hdc in next st) around. Join with sl st to top of 1st hdc. (24)

R4: Ch 2. 2 hdc in joining st. 1 hdc in next 2 sts. (2 hdc in next st, 1 hdc in next 2 sts) around. Join with sl st to top of 1st hdc. (32)

R5-8: Ch 2. 1 hdc in joining st and each st around. Join with sl st to top of 1st hdc. (32)

R9: Ch 1. Sl st loosely around hat. Join with sl st to ch 1 and fasten off. Weave in ends.

Make 2 large pom poms (I wrapped the thick yarn around 4 fingers 25 times for each pom pom) and attach to hat. Trim pom poms to appropriate size.

I hope you enjoy this pattern! :)