Tuesday, August 13, 2013

How to Make a Crochet Flower Bouquet

Wow, it has been a long time since my last post! I have been so busy this summer writing my dissertation and planning my wedding!! that my Etsy shop and blog have been running on autopilot.

Yes, that's right: I said planning my wedding!

My boyfriend and I got engaged on May 4, and we have been busily planning the wedding since we wanted to get married in the fall so that my parents could attend here in Madrid.

My one crochet project for the wedding (although more than a few have tempted me) was a crochet bridal bouquet. So here it is:


A view from above!


Please check out our photographer's photos of my bouquet on the Big Day here!

I was inspired by these beautiful bouquets to make my own:


After spending a lot of time researching floral patterns and bouquet techniques, I started crocheting.

And I crocheted. And crocheted. And crocheted. And then, just when I thought my fingers would fall off, I crocheted some more. All in all, I made about 30 crocheted flowers, 27 of which I used in the final bouquet. Some were discarded because of color - I started with yellow and white before deciding that I wanted different red and white tones.

After I finished crocheting each flower, I added a stem using 0.3mm or 0.6mm wires (three in each flower). I inserted the wire into the button, if possible, or directly through multiple layers of the flower if necessary. Then I twisted the wires together (carpal tunnel, anyone?). Each wire stem then had to be covered with green floral tape.

Just a hint: Do all of your taping last, because your hands get quite sticky and you won't want to touch your yarn after taping. I figured this out half-way through my flowers and then spent an afternoon taping the remaining half.

I used patterns from Ravelry - some free and some not - to make my flowers. Some are more traditional roses made with 100% cotton yarn and some are intricate little flowers made with size 8 crochet thread, a 1.6mm hook (ouch!) and 0.3mm metal wire crocheted directly into the petals.

Just when my work station started to look like a floral nightmare, I started wondering: How exactly do I turn these flowers into a bouquet?

Do I use a filler flower? Do I incorporate leaves? How do I get the flowers to stay together without moving around? These are some of the questions that I researched, thought about and discussed with my great crochet buddy Madalena!

After a lot of thinking (and dozens of trial bouquet arrangements without taping) I decided it was time to start making a flower bouquet from all of my crochet flowers!

First, I prepared a large work table with green floral tape and a comfortable chair.

I laid out all of my flowers according to size and color so that I could see what remained as I was arranging.


My bouquet was based on one center rose, four roses surrounding the center rose, four between those surrounding roses, and four between those surrounding roses. This helped me create a rounded bouquet shape, and I chose the smallest rose as the center. Then I added in smaller filler flowers throughout the bouquet.

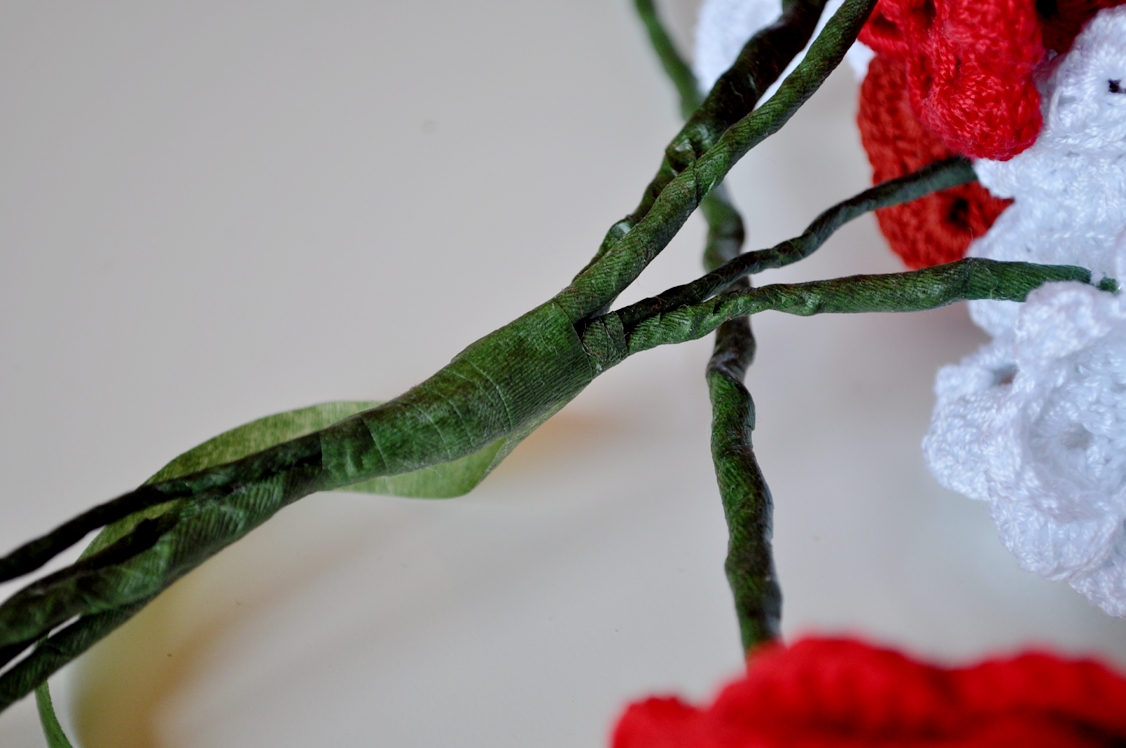
So I picked up the center rose and one of the surrounding roses and taped them together. You want to leave 2-3" before you start taping so that you have some wiggle room to readjust the flowers once they are all taped together. This goes for all the flowers.

You want to start taping about where my fingers are.
Then I added in another surrounding rose and a filler flower:


This is what the bouquet looked like from the bottom:

Don't mind that random red rose that's perpendicular to the bouquet. He just got in the way!
I continued taping each layer of four roses. You want to run the tape up and down the stems in a length of about 2-3", always remembering to leave some space between the top of the tape and the bud of the flower.

I added in filler flowers on each layer. My hands got very sticky from the tape, and it became hard to see the vision once I had a lot of flowers (which is why it helped to see clearly what I had left on the table in front of me).

Once I finished adding flowers, I taped around everything about 20 times and then broke off the floral tape.

Here's the finished product (for now!)


The next step is to trim up the "stems" and add a satin ribbon so that my hands don't get sticky on the big day!

Have you made a crochet flower bouquet? What tips and tricks helped you?

Saturday, February 23, 2013

Criss Cross makes me want to jump

After three (very long) weeks of having these two projects sitting in my basket, waiting on the perfect buttons and a surge of motivation, I have finally finished two pairs of...

Criss Cross Baby Ankle Boots!

These boots are inspired by Mon Petit Violon's Polka Dot Mary Baby Mary Janes, for which the pattern is available in her Etsy shop. Like all of her patterns, I love these high top Mary Janes, and I made a pair last year while on vacation:


However, I wanted to combine the idea of the criss cross in these Mary Janes with an ankle boot. I didn't want it to be too tall, so I made a short ankle and I closed the boot on the bridge of the foot.

I made a pair in grey (with a charcoal button) and a pair in pistachio green (with an amazingly mustardy yellow wooden button!):


My bestest crochet friend M. threw around button ideas with me, and I found these amazing charcoal buttons at her suggestion! Then I looked around in my stash and decided on the mustard yellows for the green pair after holding a button debate session at last night's Madrid Knits! yarn circle.

They are both live on my Etsy shop. The green pair is here and the grey pair is here. I am in love with this design!

I modified the design slightly between each pair, placing the criss cross higher up on the grey pair than on the green pair. I'm still not sure which I like better. What do you think?

Monday, February 4, 2013

Madrid Knits! yarn circle in Madrid

Last week, a member of a Facebook group that I am in asked whether or not there are any knitting or crocheting circles in Madrid. Another member pointed us all towards Madrid Knits!, a yarn circle that meets every week near the Santiago Bernabeu football stadium.

I was so excited about finding a group of yarnies that I wasted no time in packing up my yarn and making my way to the class on Friday evening! I had a great time getting to know all of the men and women of Madrid Knits! and I even finished a bunny crochet hat based on this pattern.

I love this pattern from Sunset Crochet on Etsy!
I still have to sew the ears on the bunny hat from Friday, but here is another one that I made last month:


You can join Madrid Knits! every Friday night (and the first Saturday of each month) if you are in the Madrid area! Here are the details:

Who: Madrid Knits! yarn circle
When: every Friday night from 17:00-21:00
Where: Starbucks, calle Pedro Teixeira, 8 (barrio Tetuán)
How: Just show up, add your name in the notebook and say hello! There are lots of English-speaking members, and it is a great chance to practice your Spanish! (There are also members that speak Dutch and Portuguese!)
Why: You need some motivation to finish that latest project, you want the inside on great yarn shops in Madrid, or you are just looking to meet some guys and gals who share your hobby for yarn crafting!

You can check out a weekly report of Madrid Knits on their blog: Madrid Knits!

Wednesday, January 30, 2013

Sale!

This week, my Etsy boutique Madrid Metro Mod reached its 30th sale! To celebrate, I am offering a 30% discount on every item in the shop! Now is the perfect time to purchase the hat or baby booties that have caught your eye!

Etsy coupon code: FIRST30SALES
Expires: February 04, 2013

Thank you to everyone who has supported my shop during these first six months! I am more dedicated than ever to bringing you high quality baby items that become family heirlooms for generations!

Hugs and stitches,


Tuesday, January 29, 2013

Blue, like the moon and Christmas without you

I made three hats this weekend after a great trip to Lanas Sixto (you can read about this yarn shop here) and when I stepped back, I realized that they were all some version of the color blue!

So, even though I had a wonderful weekend and a great trip to Segovia on Monday and am feeling as happy as a circus flea, I suppose that I have to say it... "I'm feeling blue!"

One of my favorite hats is this new double pom newborn beanie, made for a custom order for my Etsy boutique!


You can find the pattern for this double pom beanie on my blog here or on Ravelry here.

I had some leftover yarn, although not enough to make a duplicate hat (which I would have loved!) so I made a striped beanie with a giant pom pom. I love how the colors progress from dark to light!


Finally, I improvised a newborn conductors cap based on an adult pattern that I used to make my very own conductors cap. More on that later, but for now, a little teaser picture!


By the way, this indigo conductors cap is still for sale in my Etsy boutique!